Most of the time problems like “Wi-Fi Keep Disconnecting” occur in old laptops due to reasons like “Hardware Failure.” However, as incompatible Wi-Fi drivers installed on your laptops, incorrect network configuration, and erroneous power settings also cause the laptop to keep disconnecting in Windows 10.
Well, we can understand that facing one or all these listed problems related to your Wi-Fi every other day makes your experience awful and harsh.
- Wi-Fi disconnects randomly.
- Wi-Fi gets disconnected after sleep.
- Wi-Fi keeps dropping.
- Wi-Fi not getting connected.
- Wi-Fi not getting detected.
- Wi-Fi disconnects with VPN or when other devices connect.
- Wi-Fi getting limited access.
- Err_internet_disconnected.
Therefore, just to make your experience ameliorate and seamless, below given are some workarounds that you can try to get your Wi-Fi connection stable again.
With that said, let’s just get started:
- Prerequisites for Resolving ‘Wi-Fi Keep Disconnecting in Windows 10’ Issue!
- 11 Methods To Resolve the “Wi-Fi Keep Disconnecting” Error
- Method 1: Run Network Troubleshooter
- Method 2: Change ‘Home Network Public’ to Private
- Method 3: Disable Wi-Fi Sense Feature of Windows 10
- Method 4: Change Your System’s Power Management Settings
- Method 5: Changing the Power Options
- Method 6: Reset WI-FI AutoConfig. Service Type to Automatic
- Method 7: Update your Wi-Fi Drivers
- Method 8: Uninstall and Reinstall Wi-Fi Adapter Driver
- Method 9: Change Your Wi-Fi Channel to Least Crowded
- Method 10: Modify TCP/IP Configuration Settings
- Method 11: Change DNS Network Settings
Just before you start troubleshooting; you have to fulfill two prerequisites so that the repair process of the problem encountered is solved without any kind of inconvenience.
Prerequisites for Resolving ‘Wi-Fi Keep Disconnecting in Windows 10’ Issue!
Of the two, one of the basic prerequisites is to restart your system, such as Router, modem and laptop. This is to clear any glitch that may be causing the issue behind “Wi-Fi Disconnection”.
Next prerequisite is to disable third-party security software (for e.g. Antivirus), in case you have installed any and ensure security software is not blocking your Wi-Fi connection. However, if you don’t know how to do it, here are the steps for you:
- From the bottom right corner of the taskbar, click on the “Wi-Fi icon.” It will open the list of available Wi-Fi networks in your area.
- Then, you’ve to right-click on the “Wireless network” you are connected to!
- Next, click on the “Forget” option.
- After that, restart your PC, including the “Network devices” such as router, modem.
- Now, simply reconnect to your Wi-Fi network again using the “Security key.”
The third and last condition is to sign-in to an administrator account. For this, you need to use a local account that has assigned the role of “Administrator” as some of the methods listed below require you to have administrative permissions.
11 Methods To Resolve the “Wi-Fi Keep Disconnecting” Error
Essential Tip: First thing first, you should back up all your important data on an external drive as you need to change the account settings while troubleshooting the issue and in doing so, you may lose data under certain circumstances.
Method 1: Run Network Troubleshooter
Automated network troubleshooters can identify and automatically fix network and internet connection related problems.
Therefore, it is suggested that you must run the “Network Troubleshooter” on your respective PC to allow it to identify as well as automatically fix the Wi-Fi issue you’re facing at the moment.
However, if you don’t know how to “Run the Network Troubleshooter” then, here are the steps to perform:
- Step 1: Press “Windows Key + I” to open settings.
- Step 2: Inside settings, click on “Network and troubleshooter” and then “Network Troubleshooter.”
- Step 3: As you do so, a new window will pop-up that diagnoses and fixes network problems.

- Step 4: Following that, search for Troubleshooting and select the results as “Troubleshoot Settings.”
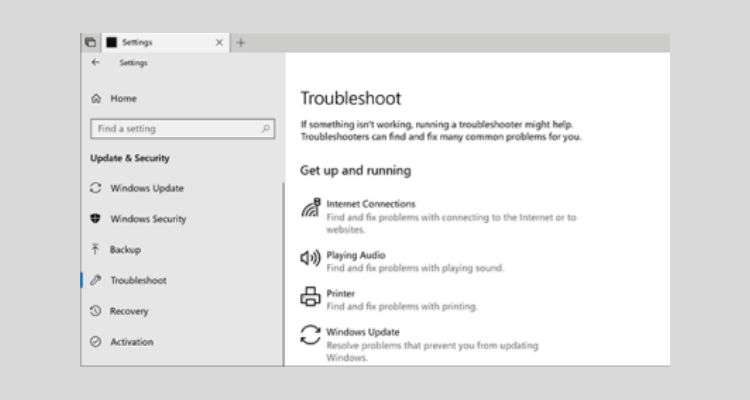
- Step 5: Upon doing so, select “Network Adapter”, and then click to “Run the troubleshooter.”
Once the diagnose process completes, restart your PC and check if your Wi-Fi dis-connectivity issue is resolved.
Method 2: Change ‘Home Network Public’ to Private
If you set your “Home Network” to “Public” then it can also cause issues related to Wi-Fi connectivity. So you have to check your home network and if it is set to public then change it to “Private” with these steps:
Point to Consider: If you have full trust in the Wi-Fi network you are connected to, then you should change your home network to private otherwise not!
- Step 1: Go to your device’s system tray and click on the “Network & Internet” icon. If it isn’t located there, click on the “Show hidden icons” arrow that points upward.
- Step 2: As you do so, all the hidden items including the “Network & Internet” option pops up on the screen and you’ve to click on the same to further open the network and internet window.
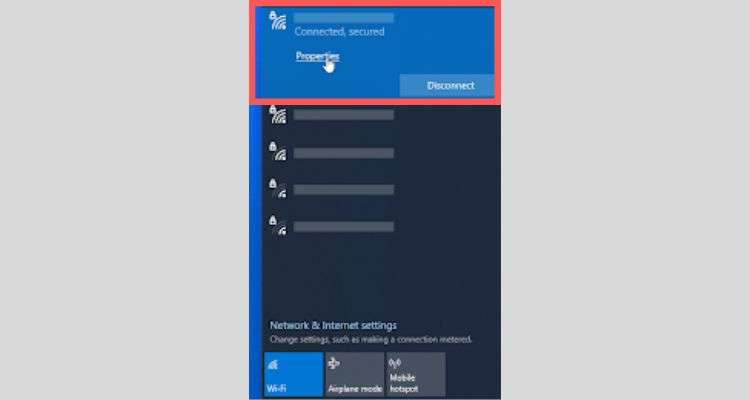
- Step 3: In that, click on your “Network” you’re currently connected to.
- Step 4: Next, click on the “Properties” link to open properties in a new window.
- Step 5: After that, you’ve to click the “Network profile heading” option on the properties window.
- Step 6: Now, finally change the “Home Network Connection” from “Public” to “Private.”
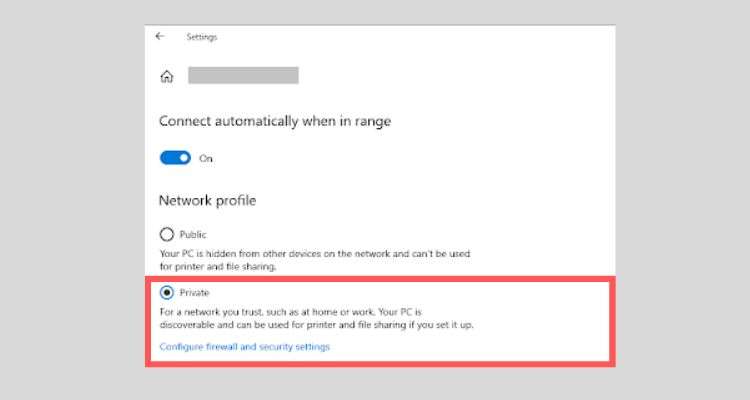
After you finish, check if your ‘Wi-Fi still keeps disconnecting’ issue has been resolved or not!
Method 3: Disable Wi-Fi Sense Feature of Windows 10
Next, you can consider disabling Wi-Fi Sense and then check if this is what is causing the “Wi-Fi disconnecting” issue in your Windows 10! That being said, here is how you can disable Windows 10’s Wi-Fi Sense feature:
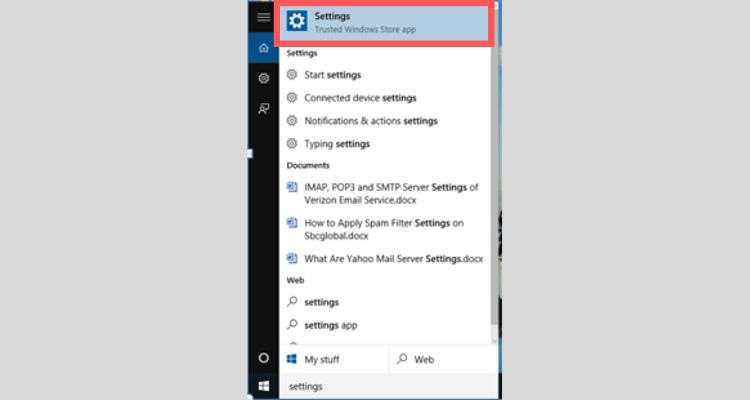
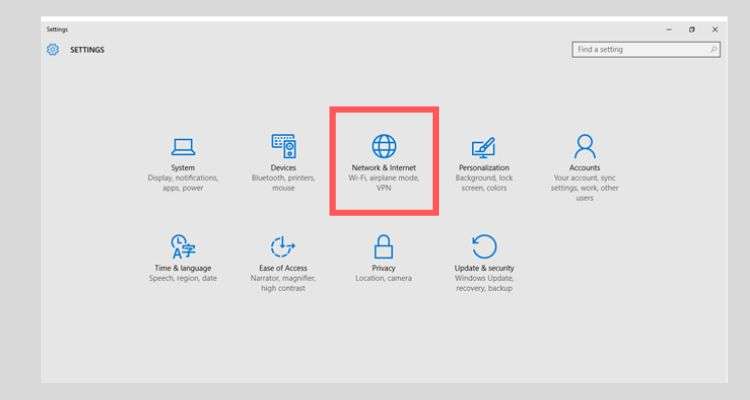
- Step 1: Press “Windows Key + I” or type “Settings” in the Windows search bar to open “Windows Settings.”
- Step 2: Then, click on the “Network & Internet” option.
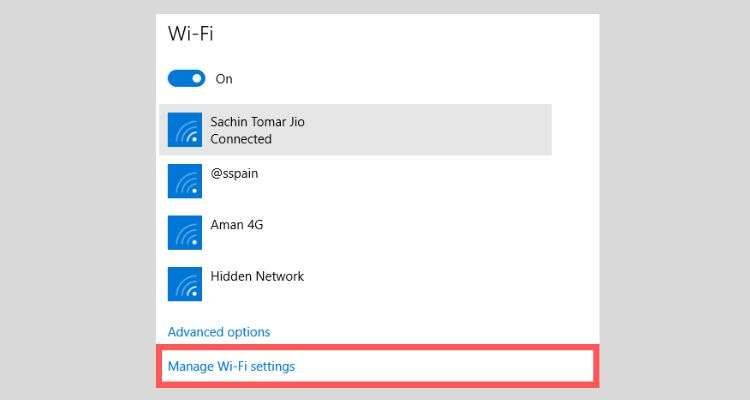
- Step 3: After that, navigate to the ‘Wi-Fi Section’ on the network & internet window with the help of a menu on the left-pane.

- Step 4: Now, on the Wi-Fi section, locate the “Manage Wi-Fi Settings” link right under the details of your current connection and click on it.
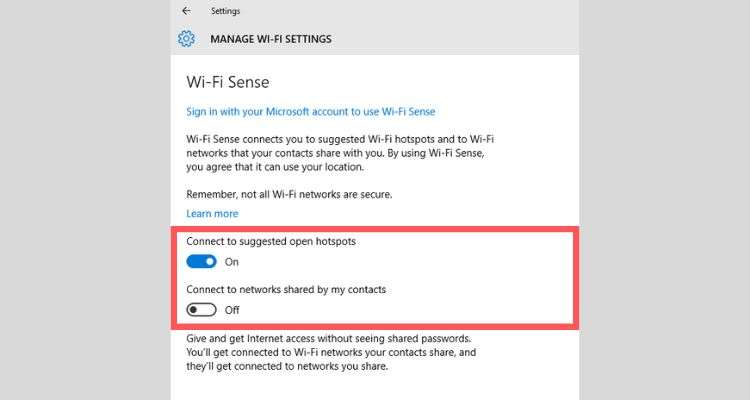
- Step 5: Next, just scroll down the Wi-Fi settings page until you reach the “Wi-Fi Sense” section.
- Step 6: Open the “Wi-Fi Sense” section and there, you’ve to toggle ‘Off’ the switch which is located under the “Connect to networks shared by my contacts” heading.
With these steps, your Wi-Fi Sense feature will be disabled and you can now restart your computer to check if doing so has fixed the problem encountered!
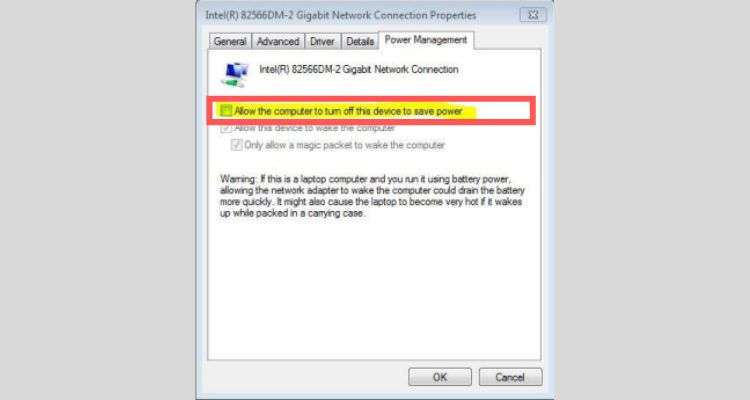
Method 4: Change Your System’s Power Management Settings
Sometimes, the power management settings disable your Wi-Fi adapter and cause your Wi-Fi network to be temporarily disconnected from the system.
Hence, it is suggested that you should check your computer’s power management settings and if necessary, change it by “Turning on/Enabling” your Wi-Fi drivers with these steps:
- Step 1: Press the “Windows Key + X” on your keyboard.
- Step 2: Then, click the “Device Manager” option from the pops-up menu on the screen.

- Step 3: After that, on the Device Manager window, you need to click on the arrow next to “Network Adapter Menu” to open its options.

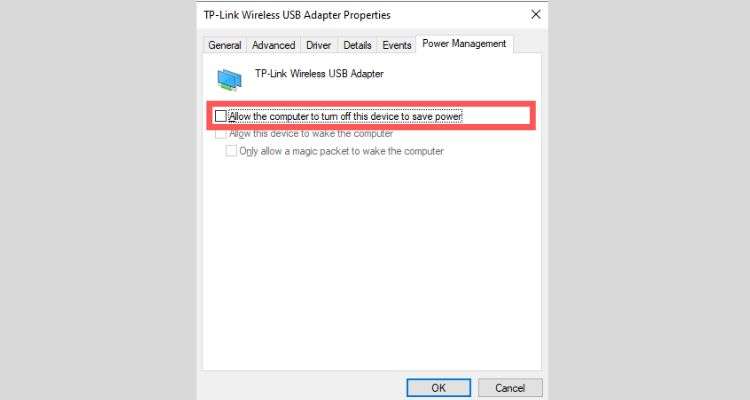
- Step 4: Now out of the available options, you have to double click on your “Network Adapter” to further open the “Power Management” tab.
- Step 5: On the power management tab, you’ve to uncheck the “Allow the computer to turn off this device to save power” checkbox.
- Step 6: Once you’ve done that, click on the “OK” button.
Now, give your Windows 10 PC a quick restart to be sure if you are still experiencing the “Windows 10 won’t connect to Wi-Fi” issue!
Method 5: Changing the Power Options
Power management lets you select a balance between power consumption or battery life and wireless adapter performance. The following power options are available on Windows* operating systems: Maximum Performance: Wireless adapter will optimize performance over power saving.
So, considering that, you should check your computer’s Power Management Settings and if needed, change it by turning your Wi-Fi Drivers ‘On/enabled’ with the help of these steps—
- Step 1: To open the “Network connection” window, press “Windows + R” and type “ncpa.cpl” followed by clicking on “OK.”
- Step 2: Then, you’ve to select the active “Wi-Fi Adapter” and choose “Properties.”
- Step 3: Below Wi-Fi properties, you’ll find an option as configure, click on “Configure.”
- Step 4: As soon as you do that, you will get an option as “Power Management”. Now uncheck the box written as “Allow the computer to turn off this device to save power”.
Point to Consider: This option automatically balances system performance and energy usage by adjusting to full performance when you need it and power-saving mode when you don’t.
Method 6: Reset Wi-Fi AutoConfig. Service Type
Wi-Fi AutoConfig. Service identifies which particular network has to be connected to your PC and automatically configures any necessary settings.
So, a disabled AutoConfig.can causes difficulties in Wi-Fi connectivity. Look at the below mentioned steps for the procedure:
- Step 1: Using “Win + R” keyboard shortcut, open “Windows Run Dialog Box”.
- Step 2: Now when you scroll down you’ll see an option as “WLAN AutoConfig.”
- Step 3: By doing so, a contextual menu will appear and from the same, you’ve to click on the “Properties” option.

- Step 4: After that, in the properties general tab, look for “Startup type” and set it as “Automatic.”
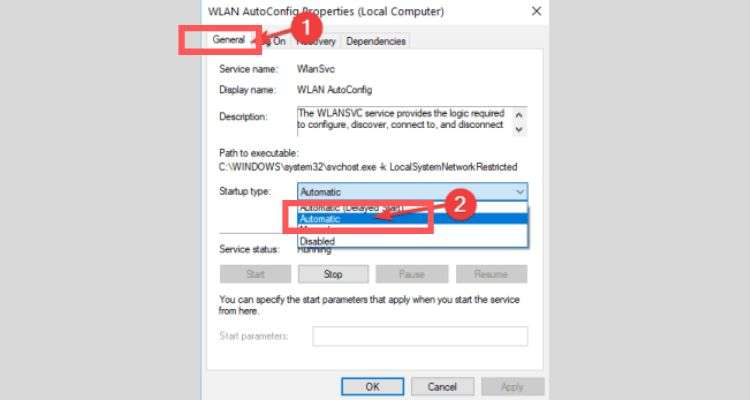
Now, close this window and restart your system to check whether your Wi-Fi issue is resolved or not.
Method 7: Update your Wi-Fi Driver
The most common reason observed behind Wi-Fi dis-connectivity is the incompatible driver. Therefore, updating to the latest version of Wi-Fi driver will probably resolve the issue.
Here are few steps regarding the up gradation of Wi-Fi Driver:
- Step 1: Press “Windows key + R”, type “devmgmt.msc” and then, press “Enter.” It will open the device manager.
- Step 2: Inside it, expand “Network adapters.”
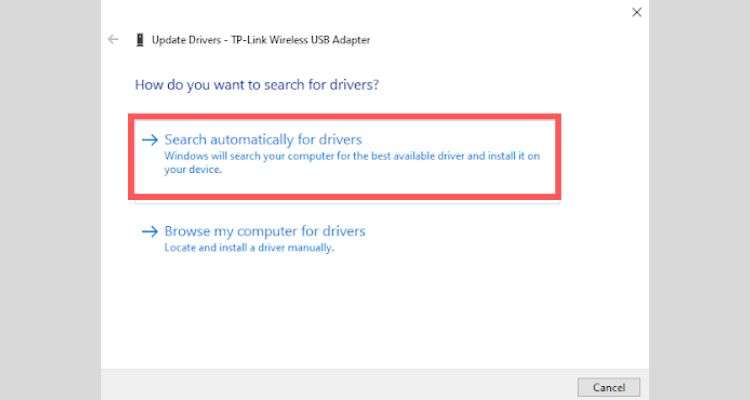
- Step 3: After that, click on the “Wi-Fi driver” and select “Update Driver Software.”
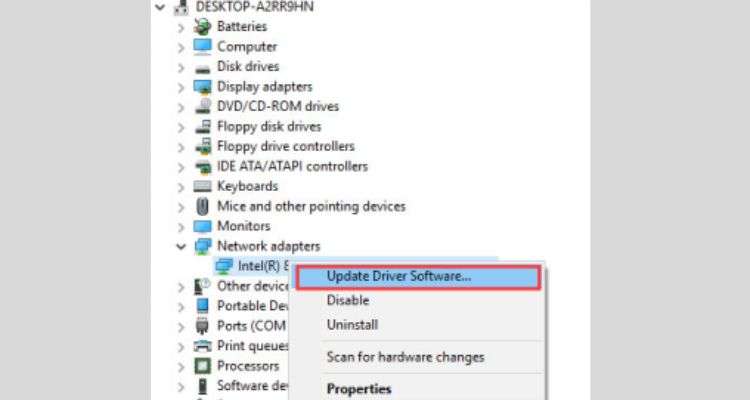
- Step 4: Now, select “Search automatically for updated driver software.”
Point to Consider: You can also update your network adapter manually by going to the manufacturer’s website for it and searching for the most recent correct driver for it. And, if you successfully find the update for your respective wireless driver on the manufacturer’s website, you’ll have to manually install it on your computer.
Now, coming back to the point, once you are done installing the latest update, restart your PC to see whether it is of any help to resolve the W-Fi issue you’ve encountered.
Method 8: Uninstall and Reinstall Wi-Fi Adapter Driver
Reinstalling the Wi-Fi adapter, that too, the latest driver’s version – is yet another way to fix outdated Wi-Fi Drivers causing windows 10 internet disconnecting randomly!
For better understanding, find the below mentioned steps:
- Step 1: Open the “Device manager” tool using “devmgmt.msc.”
- Step 2: Then, you’ve to click on the arrow beside “Network adapters” to expand its options.
- Step 3: Now, you’ve to right click on your “Wi-Fi driver” and select “Properties.”
- Step 4: On the properties window, right-click on the driver again and click on “Uninstall Driver.”
- Step 5: After this, press “OK” for the confirmation.
- Step 6: Once you have uninstalled the Wi-Fi driver, go to “Windows Update” and update your Windows. Doing so will download an updated driver along with other useful updates.
Once you are done with the reinstallation, restart your windows PC to hopefully not experience the same Wi-Fi issue again.
Method 9: Change Your Wi-Fi Network Channel to Least Crowded
To resolve the “Wi-Fi disconnecting error” on Windows 10 you can also consider changing your Wi-Fi network channel to least crowded and to do so:
- Step 1: You need to first download the “WiFiInfoView” tool using this Link.
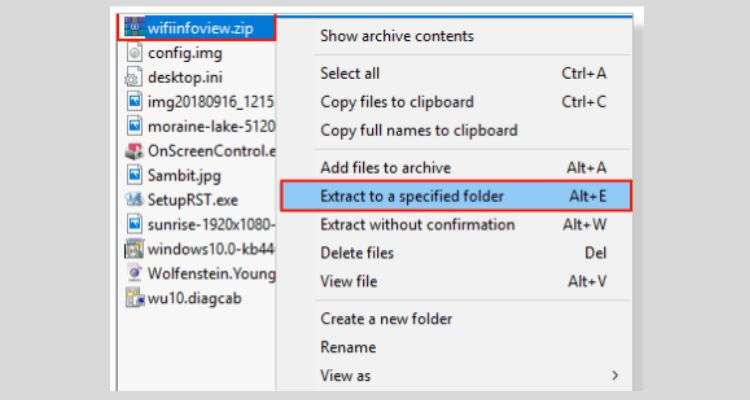
- Step 2: When you finish downloading the WiFiInfoView tool on your system, go to the “Download” section and right-click on the “downloaded WiFiInfoView file.”
- Step 3: As you do so, a contextual menu will pop-up on the screen and you’ve to click the “Extract to a specified folder” option from it.
- Step 4: Now, in order to extract the WiFiInfoView files, you’ve to select a “preferable location” on your driver.
- Step 5: After selecting the location, you need to just navigate to the exact location and there, you can simply “extract the WiFiInfoView files.”
- Step 6: Once you finish doing so, you require double-clicking on the “WiFiInfoView tool” to “Run” the same.

- Step 7: Next, you will see a list of all the “Wi-Fi routers” that you have. From that list of Wi-Fi routers, you need to locate the routers that are using the least congested channel. For example- Channel 6 because the higher the number of Wi-Fi routers, the greater the overlap of Wi-Fi signals.

- Step 8: Once you’ve selected Channel 6, move on to open the “Router Settings” webpage with the help of your preferred web browser.
- Step 9: Now, on the router settings webpage, you need to go to the “Wireless Settings tab” and click on the “Channels” option. This helps you see the list of available channels ranging from 1 to 11 (for 5GHz router) of your router.
- Step 10: From all the available channels options, you can select the “least crowded Wi-Fi channel.”
- Step 11: After making your selection, click the “Apply” button to save the changes you made to switch from your Wi-Fi channel to the least congested channel.

Now, don’t forget to reboot your router to make sure that the problem you’ve encountered gets resolved.
Method 10: Modify TCP/IP Configuration Settings
It has been observed that even changing the TCP/IP configuration settings sometimes fixes the “Wi-Fi disconnecting” issue. So, you should also give it a try by following these steps:
- Step 1: Type “cmd” in the Windows Search Box. As you do this, a list of search results will pop-up on the screen and you will have to right-click on the “Command Prompt” option from the same.
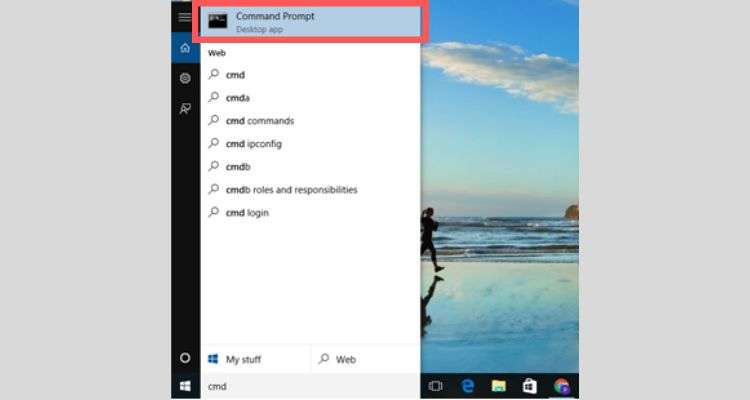
- Step 2: Then, you need to click on the “Run as administrator” option from the contextual menu that appears in front of you.

- Step 3: After that, copy-paste the below-listed commands in the “Command Prompt” app.
- ipconfig /release
- ipconfig /renew
- arp -d *
- nbtstat -R
- nbtstat -RR
- ipconfig /flushdns
- ipconfig /registerdns
- netsh winsock reset
- netsh int ip reset c:\resetlog.txt
- Step 4: Every time you paste a command, be sure to hit the “Enter” button.
Now, check if doing so helps you fix that frustrating “Wi-Fi keeps disconnecting” issue.
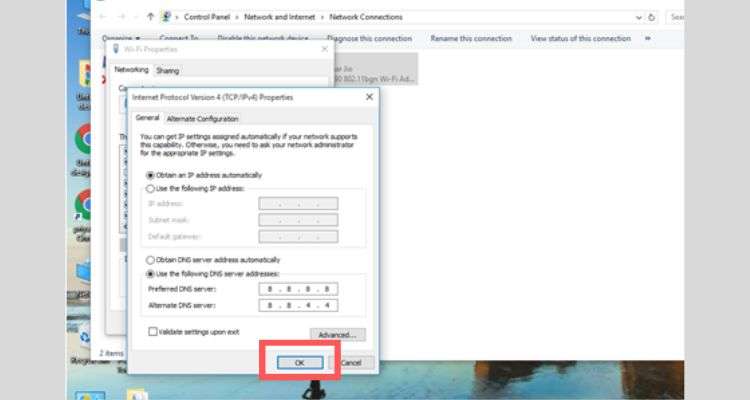
Method 11: Modify DNS Network Settings
Last but not least, you can try modifying DNS network settings to see if that helps you resolve the encountered issue with your Wi-Fi. To modify DNS network settings, follow these steps:
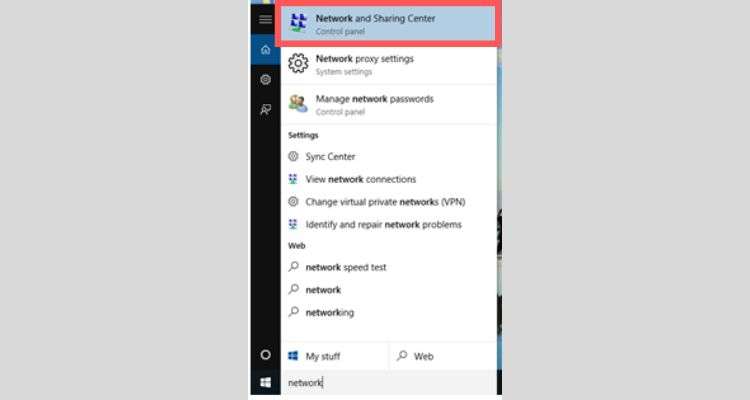
- Step 1: Type “Network” in the Windows Search box, and select the “Network and Sharing Center” option to open the “Network and Sharing Center” window.
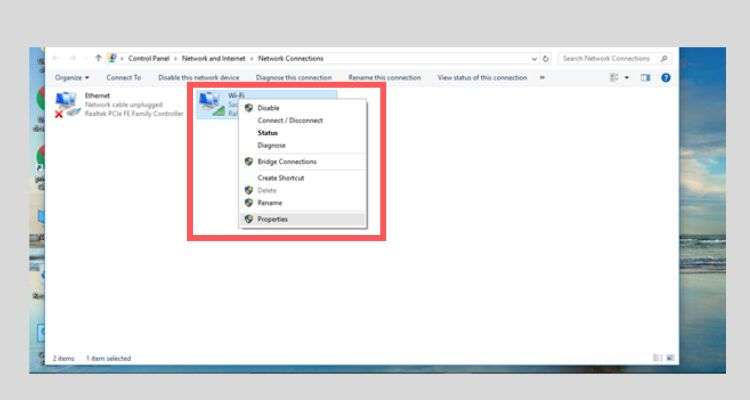
- Step 2: There, on the Network and Sharing Center window, right-click the “Wi-Fi Network” option that you’re right now using on your PC.
- Step 3: In doing so, a contextual menu will pop-up on the screen and then, you’ll have to click on the “Properties” option from it.
- Step 4: On the properties window, you’ve to double-click on the “Internet protocol version IPV4” option.

- Step 5: Following that, open the “Use the following DNS server” section and type—
- “8.8.8.8” in the Preferred DNS Server text-field.
- “8.8.4.4” in the Alternate DNS Server text-field.
- Step 6: Once you’ve done this, click on the “OK” button to save the made changes.
Conclusion
This troubleshooting guide above contains some of the effective methods for resolving “Wi-Fi frequently and randomly disconnecting on Windows 10”, issue and will surely help you to have the pleasant experience using your systems, like before!